If using a byline, add your text here and use emphasis/italics for the correct styling.
Using news post titles of around 125 characters will help ensure that your title will be displayed legibly by Arts CMS Featured News modules. Using longer titles can cause issues with readability, particularly on narrower screen sizes.
Using the “Blockquote” text format with relevant keywords for your opening paragraph will help readers quickly identify what to expect from your post and can also improve Search Engine Optimization (SEO) and User Experience (UX).
This template post provides guidance and formatting tips for creating news posts where the content is broken into chunks or sections, which could include listicles and how-to articles. Examples of section-structured posts can be found here, here, and here.
In addition to inserting content within this visual editor, you will also have to select the relevant taxonomy (types, topics, categories, and tags) as well as set a featured image from the options on the right-hand side. If you intend on featuring a news post on a specific page of your website, you should also include a short expert from the options down below to provide a preview of what this news post is about at a glance.
If you intend your post to follow the formatting of a Q&A/interview or a long-format feature article, there are alternative post templates that provide guidance for those types of content. For further information on Arts CMS, browse our help site.
Using a horizontal line can be a great way to clearly add structure and hierarchy to your posts. If using lines to define and divide sections, make sure that you are consistent about how and when you use them. An example of a horizontal line can be seen above this paragraph.
To insert a line into your post, first place your text cursor at the point in your text flow that you would like the line to appear, next select the “Horizontal Line” button in the toolbar (if this is not visible by default you may need to first select “Toolbar Toggle” to reveal the expanded range or options).
Use text formatting to create structure and hierarchy in your posts. Text styles can be chosen using the “Paragraph” dropdown menu in the top left corner of the tool bar. Be consistent with how you style your text.
Heading 2
Heading 3
Heading 4
Heading 5
Heading 6
Jane Test (She/Her/Hers)
Use italicized standard text below the persons name to add affiliation details
If using in-text bio pics in the flow of text, such as in this example, using right alignment for your image creates fewer issues with awkward text breaks. If using a profile photo to go along with your text (such as in this section example), a circular image can help provide visual interest to your post. Photoshop templates for this type of image are available to ensure your image is correctly sized and cropped. To access the template please contact Arts Communications.
When using sections within your post, be consistent with how you format text, images, or any other layout elements to help readers better understand your content. In this template, we have included a number of ways that you can section your content, but it is best to use only one type of section format consistently with live, public-facing posts on your website.
For Q&A sections, how should I distinguish question text from answer text?
Use bold italicized text to indicate questions and standard text to indicate the answer. If you want to use part of the answer as a pull quote, this can be achieved using the pull quote module. Details on how to do this are towards the bottom of the post.
Do you mean like this?
Yes, exactly! One additional note: make sure to use the same formatting throughout the article to help reinforce the structure of the article and make it easier to read and understand.
Button modules can be added for a clear call to action at the end of a section. To add a button, go to “Add Module” > “Button”. The shortcode for the module will be inserted onto your page at the location of your text cursor.
John Test (He/Him/His)
affiliation 1 e.g Hometown
Affiliation 1 details
affiliation 2 e.g Employer
Affiliation 2 details
affiliation 3 e.g Job Title
Affiliation 3 details
If using in-text bio pics in the flow of text, such as in this example, using right alignment for your image creates fewer issues with awkward text breaks. If using a profile photo to go along with your text (such as in this section example), a circular image can help provide visual interest to your post. Photoshop templates for this type of image are available to ensure your image is correctly sized and cropped. To access the template please contact Arts Communications.
When using sections within your post, be consistent with how you format text, images, or any other layout elements to help readers better understand your content. In this template, we have included a number of ways that you can section your content, but it is best to use only one type of section format consistently with live, public-facing posts on your website.
For Q&A sections, how should I distinguish question text from answer text?
Use bold italicized text to indicate questions and standard text to indicate the answer. If you want to use part of the answer as a pull quote, this can be achieved using the pull quote module. Details on how to do this are towards the bottom of the post.
Do you mean like this?
Yes, exactly! One additional note: make sure to use the same formatting throughout the article to help reinforce the structure of the article and make it easier to read and understand.
Button modules can be added for a clear call to action at the end of a section. To add a button, go to “Add Module” > “Button”. The shortcode for the module will be inserted onto your page at the location of your text cursor.
This is how a caption appears.
This section format works well for book lists, Faculty work, etc.
Name goes here
Images can also be made to left or right align, and to break out of the content area, as in the examples shown in this section.
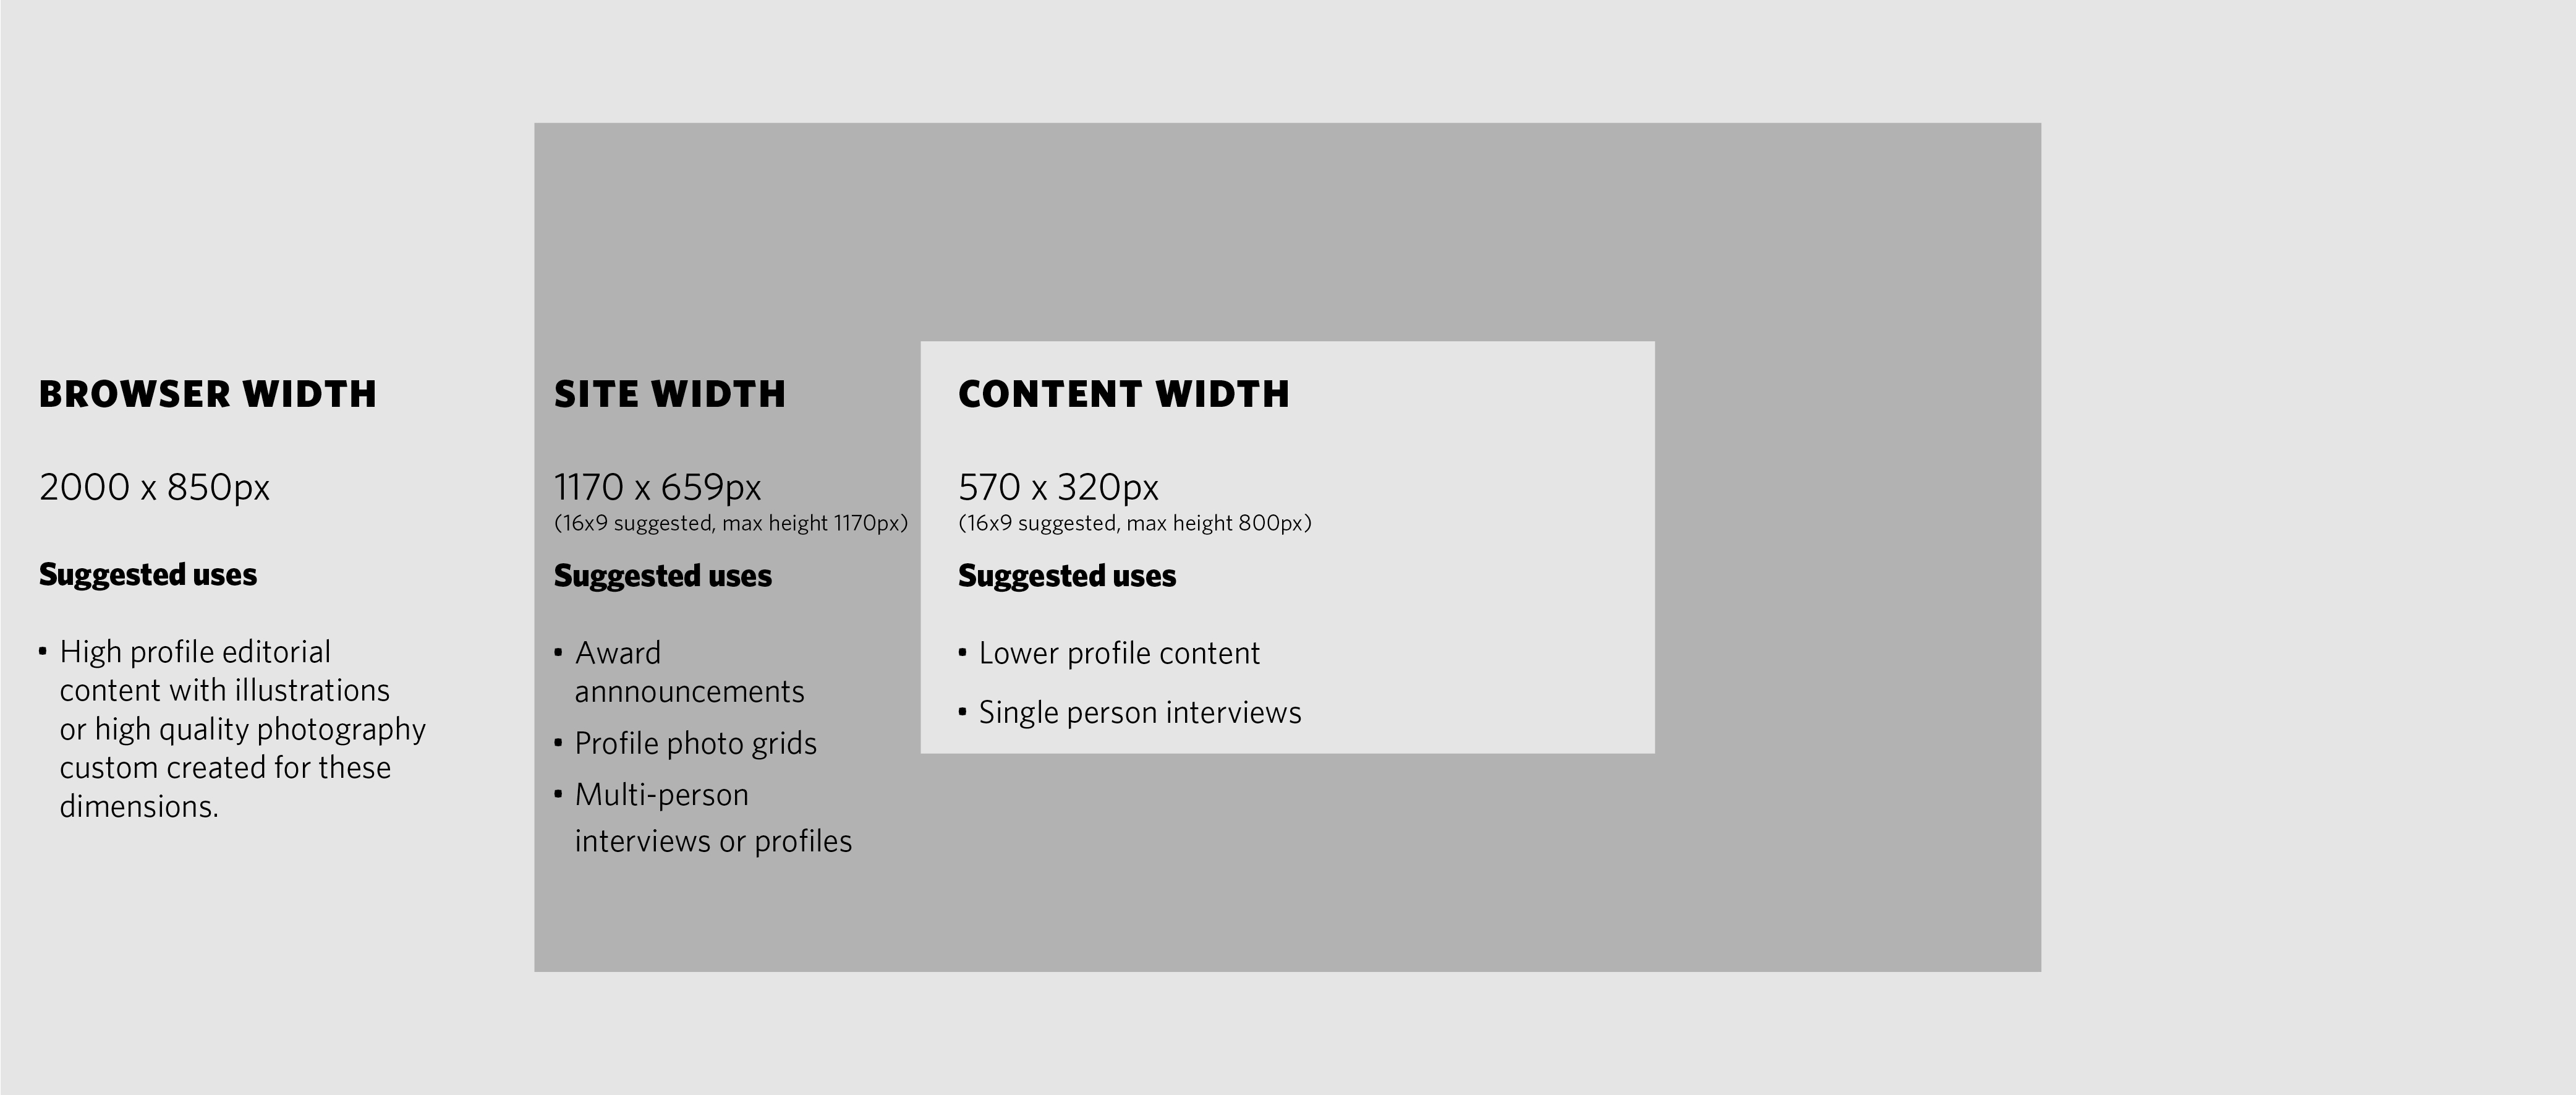
Images can also be made to left or right align and to break out of the content area, as in the examples shown in this section. To use this option on your post select “Add Module” > “Embedded Image” > “Aligned” > “Left” or “Right” depending on your preference, then add the URL from the media gallery to create a link to your image. If desired, you can add any caption text in the caption field, otherwise leave this field blank. With a maximum width of 285px, left/right aligned image formatting is not recommended for images with landscape dimensions.
For Q&A sections, how should I distinguish question text from answer text?
Use bold italicized text to indicate questions and standard text to indicate the answer. If you want to use part of the answer as a pull quote, this can be achieved using the pull quote module. Details on how to do this are towards the bottom of the post.
Do you mean like this?
Yes, exactly! One additional note: make sure to use the same formatting throughout the article to help reinforce the structure of the article and make it easier to read and understand.
Button modules can be added for a clear call to action at the end of a section. To add a button, go to “Add Module” > “Button”. The shortcode for the module will be inserted onto your page at the location of your text cursor.
Use the heading styles to create structure and hierarchy within the sections (this is an example of Heading 3).
If you need a heading style within a section, you can use Heading 4.
When using sections within your post, be consistent with how you format text, images, or any other layout elements to help readers better understand your content. In this template, we have included a number of ways that you can section your content, but it is best to use only one type of section format consistently with live, public-facing posts on your website.
This is how a caption appears.
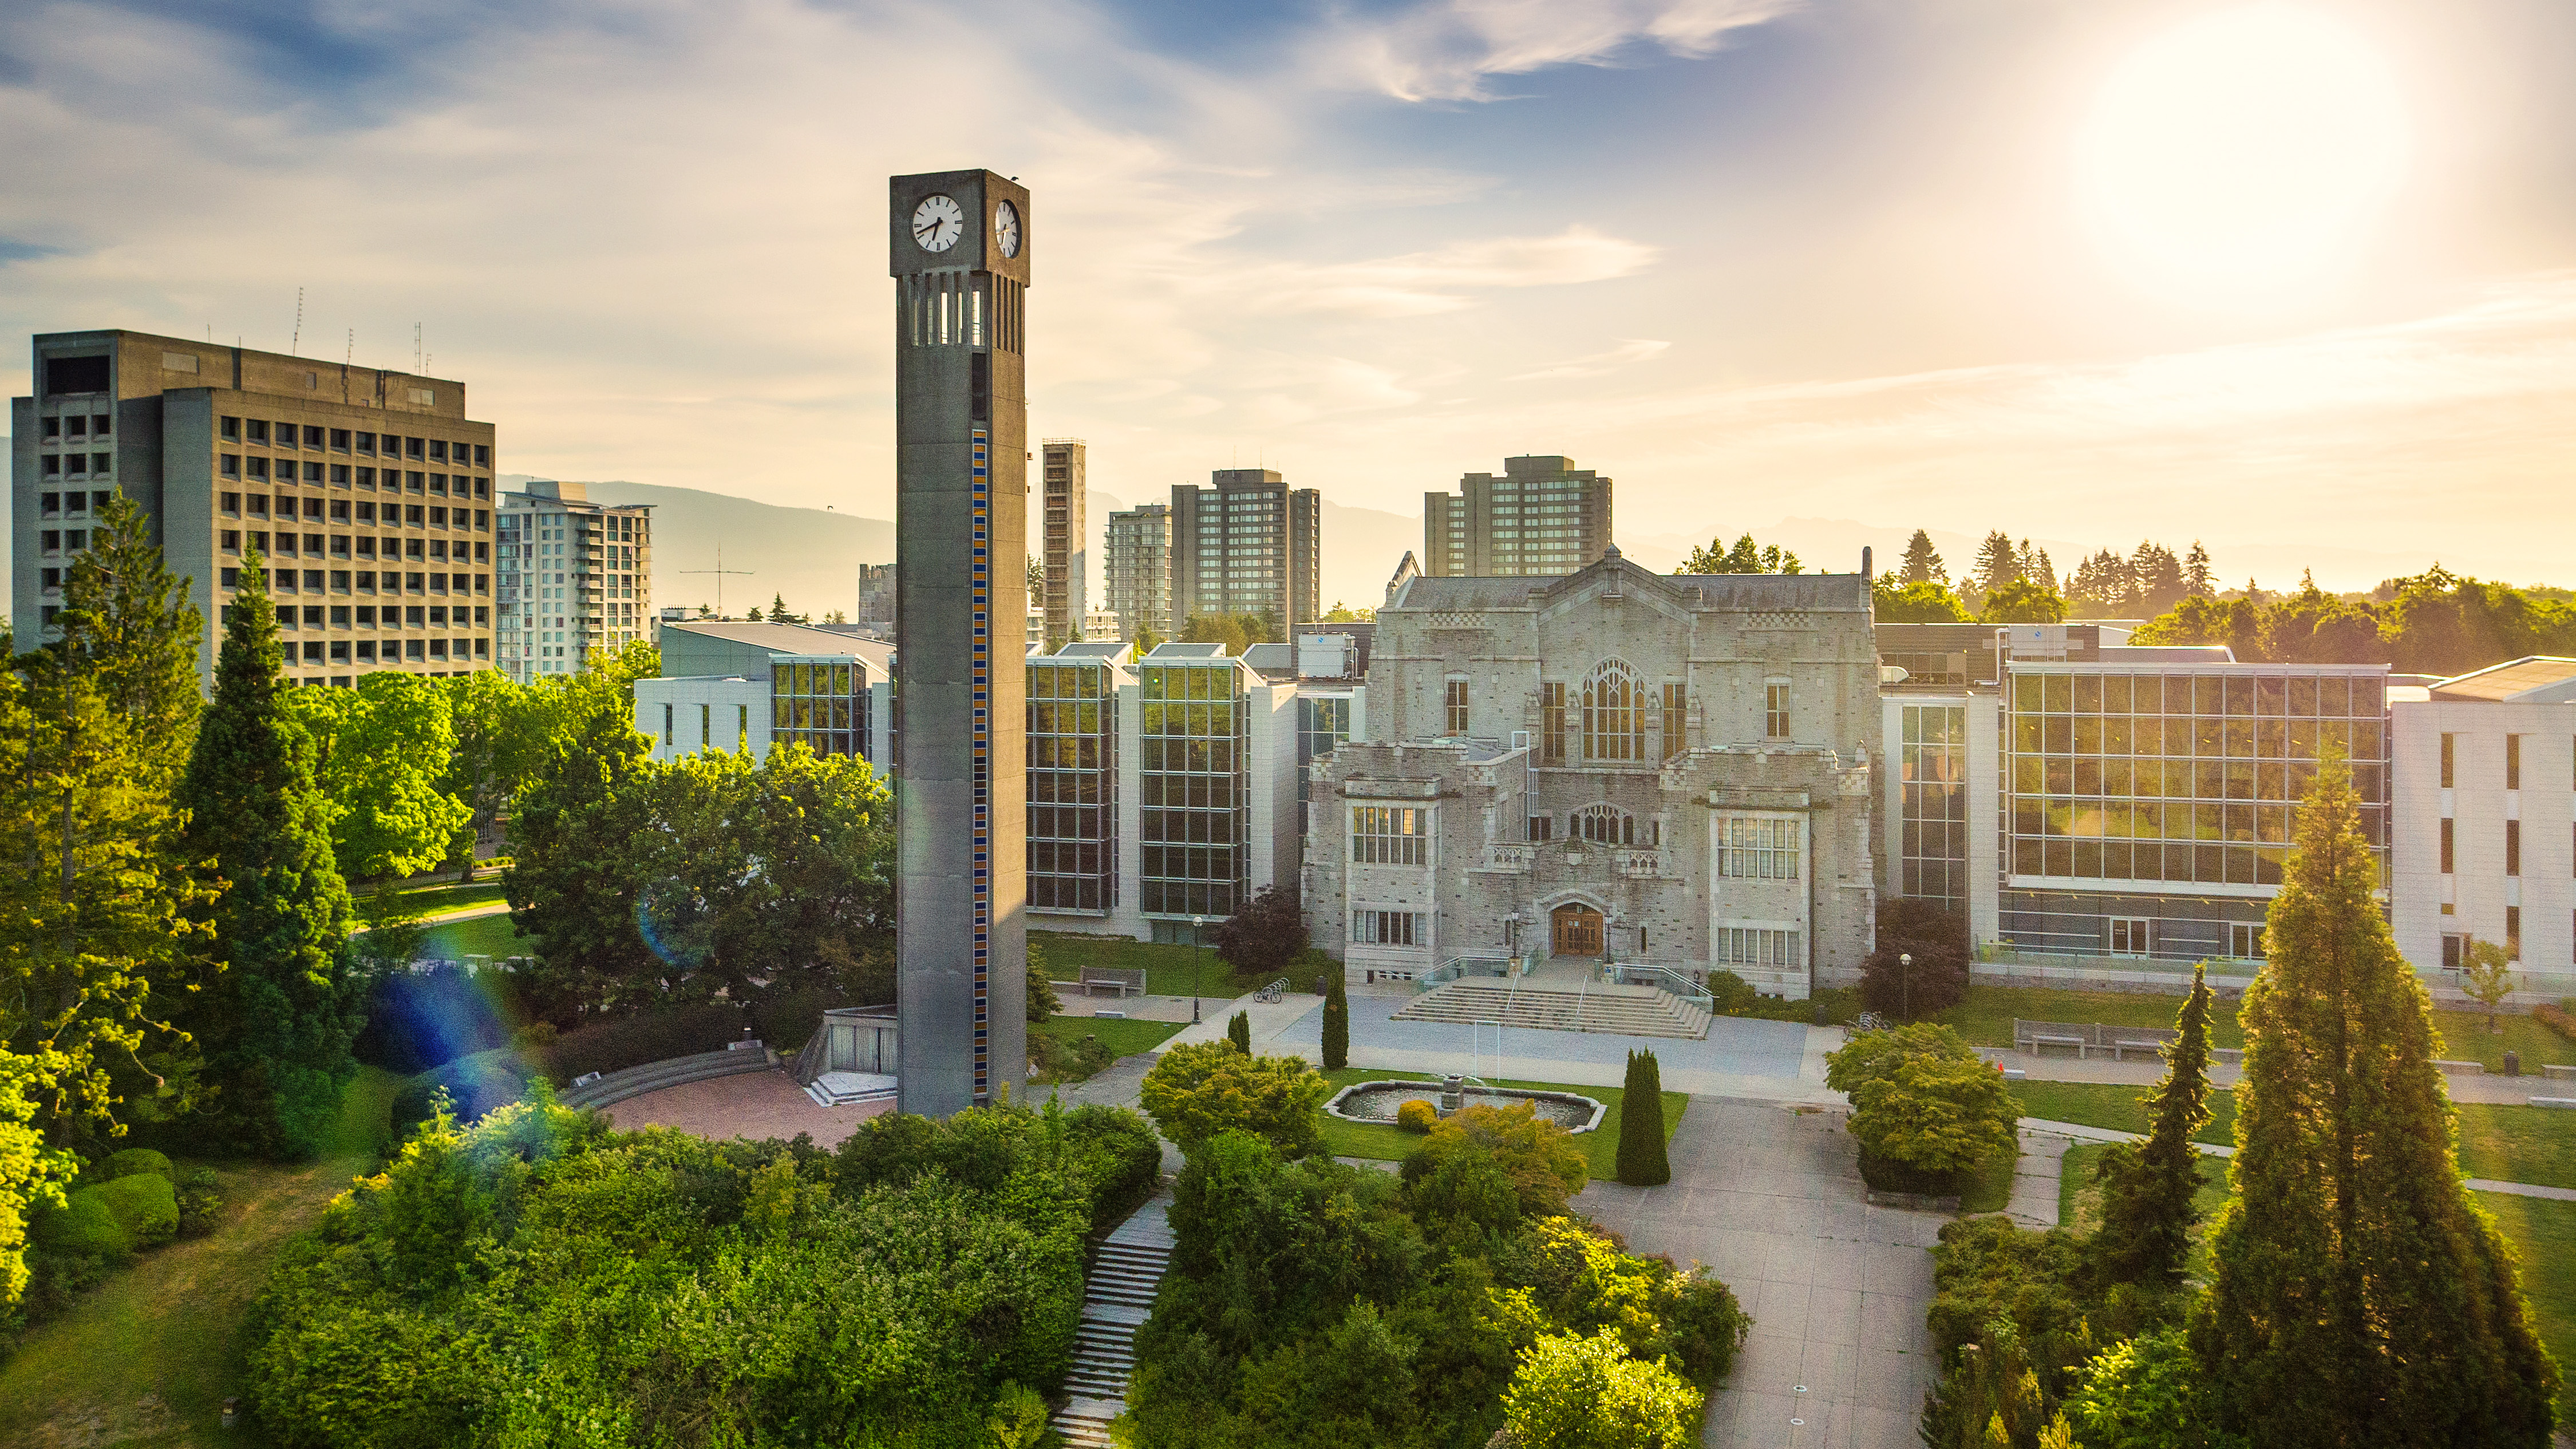
Using an image is also a great way to indicate the start of a new section.
To add a content-width centred image like the one shown above, select the option to “Add Module” > “Embedded Image” > “Spread” > “Content” and add the URL from the media gallery to link your image. If desired, you can add any caption text in the caption field, otherwise leave this field blank.
When using sections within your post, be consistent with how you format text, images, or any other layout elements to help readers better understand your content. In this template, we have included a number of ways that you can section your content, but it is best to use only one type of section format consistently with live, public-facing posts on your website.
1. For articles that use titles, such as “Ten ways to…” or “These are the top 5…”, use numbers at the start of each section heading to reinforce the structure suggested by the article title.
This is how a caption appears.
Images can also be made to left or right align and to break out of the content area, as in the examples shown in this section. To use this option on your post select “Add Module” > “Embedded Image” > “Aligned” > “Left” or “Right” depending on your preference, then add the URL from the media gallery to create a link to your image. If desired, you can add any caption text in the caption field, otherwise leave this field blank.
This is how a caption appears.
The maximum possible width of a left or right aligned image when breaking out of the content section is 285px. Square and portrait images will display best, but for landscape images, it’s recommended to use the content-width centred option described above. When using left or right aligned styling for your images, pay close attention to how the image and any caption interact with the surrounding text, paragraph breaks, or any modules above and below to make sure each element has sufficient space.
“Content goes here”
In many cases, it can be useful to include a call to action (CTA) at the end of your post. One option to do this within Arts CMS is to use a button. To add a button, go to “Add Module” > “Button”. The shortcode for the module will be inserted onto your page at the location of your text cursor.
Another option for presenting high-priority CTA’s is to use the card module. To add a card module, select the “Add Module” > “Card”. Next, you will be prompted to choose the number of cards you would like to add (there are options for 1,2 or 3), once selected you will see a number of fields where you can add content to your card(s). Once added, your card will display as per the example shown below.
Add your Author bio text here.
To ensure your image is correctly sized, use the same dimensions and positioning as the image in the example here.