Pages can be added to, or removed from, the top-level navigation menu and side navigation menu on your website, but it is recommended to follow the best practices for site structure before making any new adjustments. Learn how to edit the menu in WordPress on Arts CMS.
Accessing your dashboard
In order to make any type of change to your website you must first log in to the backend or dashboard of your website.
Start by adding “/wp-admin” to the end of your website URL (yoursite.ubc.ca/wp-admin). You will then be prompted to enter your CWL information on a CWL Authentication page. Once logged in, the page will load to your website dashboard.
Editing and managing your site’s top-level
To edit the top-level menu:
- In your dashboard, go to Appearance > Menus
- In the left-hand column, under “Pages”, check the page you would like to add
- Click Add to Menu
- The new page will then appear at the bottom of the list of pages in the Menu Structure
- Drag the page where you would like it to appear on your site
- Click on Save Menu to save your work
Tip: Remember when making changes to the top-level menu, make sure that the same changes are reflected in the side navigation menu.
Editing and managing side navigation menus
A number of steps must be taken in order to establish the side navigation menu. The parent-child relationship between pages must be established to nest pages in the side navigation menu.
In addition, the side navigation menu pages will be listed based on the order assigned to them. If no order is set or if there are pages with the same order, the navigation will be sorted alphabetically by default.
First, set up the parent-child relationship between pages:
- In the child page, go to the setting Page Attributes
- Under the section Parent, select the parent page for the current page to be nested under (Note that there is no options to select child pages)
- Click on Update or Publish to save your changes
Next, set up the page order:
- In the page, go to the setting Page Attributes
- Under the section, Order, enter a number greater than or equal to zero to indicate the order in which you would like this page to appear on the side navigation menu. (zero being at the top)
- Click on Update or Publish to save your changes
Tip: Remember when making changes to the side navigation, make sure that the same changes are reflected in the dropdown options of the top-level menu. To edit this, refer to How do I edit my site’s top-level menu?
Editing your site’s footer
The site footer is used to add social media buttons or to redirect site audience to different social media outlets.
To add/modify your unit’s social media information:
- Go to Dashboard
- Go to Appearance > Theme Options
- Select the UBC CLF tab
- Scroll to the section titled Social Links
- Enter the url of your social media profile into the corresponding fields
- Click on Save Changes to save the settings
Creating redirects from an old page URL to a new URL
The Safe Redirect Manager is a tool within WordPress that you can use to safely redirect your page or post’s old URL to a new URL.
- Go to your Dashboard
- Go to Tools > Safe Redirect Manager
- Click on the Create Redirect Rule button
- Enter the old page URL into the Redirect From: field
- The old URL is the page address after the root URL of the site
- Enter the new page URL into the Redirect To: field
- Set the HTTP Status Code: field to “301 Moved Permanently”
- Click on Publish to save the new redirect rule
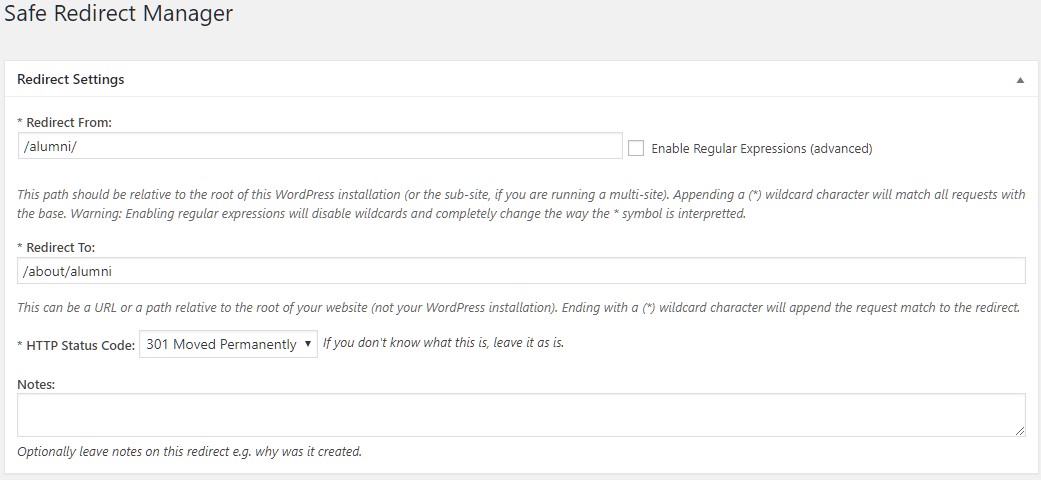
Example Use Case
If you want to update the address for your Alumni page which was located in https://sitename.ubc.ca/alumni/ to the new location https://sitename.ubc.ca/about/alumni/, use the settings as shown below:
- Redirect From field would be /alumni/
- Redirect To field could be either /about/alumni/ or https://sitename.ubc.ca/about/alumni/
- HTTP Status Code field to “301 Moved Permanently”