If you are using UBC Mailing Lists (LISTSERV) to distribute emails to your larger mailing lists, you can use this LISTSERV automation setup to help you save time and reduce manual data entry errors when maintaining your mailing list.
This LISTSERV automation setup will take an entry from one of your forms and automatically move their contact information (name and email) into one of your desired LISTSERV lists.
How it works
When a user fills out a specific form on your website, their name (first and last) and email address will be automatically added to a LISTSERV mailing list that you’ve selected. When the form is submitted, the website administrator will receive a notification email letting them know that someone has completed the form.
As the administrator, you will have to open the email notification and click “confirm.” If you do not click “confirm”, the form entry will not be added to your LISTSERV mailing list. However, once you click “confirm”, you will have that user’s contact information in your LISTSERV without having to manually enter the data yourself.
Form settings
In order for this automation to work correctly, you must ensure that your Form settings are properly set up. First, go to the Forms section in the dashboard of your website. Locate the form that you want to automate, go to Settings, and then click “Notifications”.
In the Notifications section, you will need to complete each field as follows:
Name: This is the name that you give to this automation. If you are going to create multiple automations on the same form, it is recommended to create mutually exclusive titles.
Send to Email: In this field, put: listserv@lists.ubc.ca. This will ensure that form entries will be taken to your LISTSERV server.
From Name: Once setup is complete, you will receive an email notification every time a form entry is submitted. This field indicates where the email is being sent from. We recommend just including “Admin” in the title if you are receiving notifications in your admin email address.
From Email: This is the email address that will receive email notifications. Please make sure this is an email that you check regularly. You must complete a step in the email notification itself to successfully move the form entry into your desired Listerv list.
Subject: This is the subject line of the email notification. Please keep it to one word, otherwise the automation may not work. We recommend, “Subscribe.”
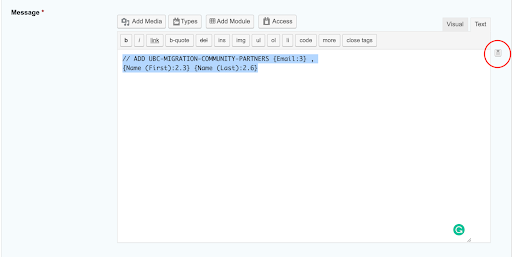
Message: This is the most important field to configure. To start, ensure that you are in the text editor view. This can be found in the top right corner of the message section where you will see two tabs titled, Visual and Text. Click on the Text tab and then copy and paste the code below into that field:
// ADD NAME-OF-LISTSERV-LIST {Email:3} ,
{Name (First):2.3} {Name (Last):2.6}
This shortcode tells LISTSERV which fields to bring over from the form and which lists they should be added to.
You will have to make a manual adjustment to this shortcode. Instead of NAME-OF-LISTSERV-LIST, you will put the name of the list that you want entries to be forwarded to. Please note that the name must be capitalized and all spaces should be replaced by a dash or hyphen.
The fields in the curly brackets are the fields that will be moved over into LISTSERV. For this automation, only the names (first and last) and the email address will be moved over.
Please note that the numbers in the name and email fields are referencing the form itself. If those numbers don’t match up with the form fields then the automation will not work. To edit those, select the appropriate fields by clicking on the All Submitted Fields button on the right side of the Message field (see screenshot). Then select the appropriate fields and they will automatically show up in the text editor. Ensure that they follow the same format as the example above and that section is complete.
Auto-formatting: Check the box to Disable auto-formatting.
Conditional Logic: Leave unchecked unless you want to send different entries to a specific list. See next section for more details.
Save: Once your form is set up, click Save to add the notification. If you are making updates to the existing notification, click Update Notification.
Now you are all set up! If you are having any trouble, feel free to reach out to us at arts.helpdesk@ubc.ca.
Setting up conditional logic
You can also set up your form to filter form entries into separate LISTSERV lists. For example, if you have a separate mailing list for graduate students, then you may want to set up a separate automation so that other users are not accidentally being added to this list.
This setup is for separate mailing lists that use the same form. If you have a separate form for each list, then you can follow the same instructions as above. If your form uses checkboxes to identify a user group, then we can successfully implement conditional logic to filter form entries.
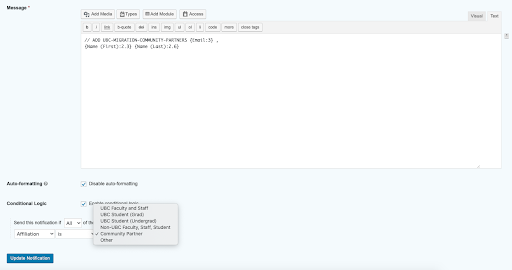
The setup is the same as stated before. The only difference is the Conditional Logic field at the bottom of the page. This time we’re going to check that box and then configure the logic to our needs.
Here it will ask you to send this notification if the following conditions are met. First, you will have to select the form field that we need the conditions to meet. Then we will select the condition itself. This will vary depending on your needs. Lastly, select the checkbox value itself for the condition to be met.
Once the conditions have been set you will need to go back to the Text Editor of the Message field and change the name of the LISTSERV list based on where you want to send this entry.
In the below example from the unit wanted, they wanted anybody who selected the Community Partner checkbox to have their entry automatically added to their Community Partners LISTSERV list.
Therefore, we set up the conditional logic to Send this notification if All of the following match:
The Affiliation (name of the checkbox form field) is Community Partners.
Setting up conditional logic for multiple LISTSERV lists
If you want to set up conditional logic for a number of checkboxes on the same form, then you will need to repeat the same setup process as above for each LISTSERV list.
In other words, if you have four checkboxes with four separate mailing lists, you will set up four separate email notifications with the proper conditional logic on the same form. When doing this, please make sure that the correcting name of the LISTSERV lists matches the conditional logic.